Reviving a Mid-Size Legend: Windshield Replacement for the 2004-2012 GMC Canyon
The first-generation GMC Canyon (2004-2012) was engineered for drivers who demanded uncompromised rugged utility without the heavy footprint of a full-size pickup. With its robust inline-five engine options and highly durable chassis, this mid-size workhorse continues to dominate both demanding job sites and everyday commutes. However, whether you are hauling equipment across unpaved trails or navigating the high-speed corridors of the Greater Toronto Area, your truck's windshield is subjected to intense stress. A compromised, cracked, or severely chipped windshield does not just obscure your vision; it critically degrades the structural integrity of your Canyon’s cabin. As a Master Technician at AlexWindshield, I have executed hundreds of flawless installations on this specific GM platform. We understand the unique pinch weld architecture and the specific aerodynamic curvature of the 2004-2012 models, ensuring your classic truck receives a structural reset that meets and exceeds factory standards.
Why Your First-Generation GMC Canyon Deserves Expert Auto Glass Care
For vehicles manufactured over a decade ago, windshield replacement is never a simple "pop-out, pop-in" job. The 2004-2012 GMC Canyon specifically requires meticulous attention to the metal pinch weld, as prolonged exposure to harsh Canadian winters often introduces hidden rust under the old urethane. Installing a new premium OEM-equivalent windshield requires specialized knowledge of these older GM channels to ensure zero wind noise, absolute water tightness, and perfect alignment. Trusting an amateur with your truck can lead to devastating leaks, electrical damage, and premature corrosion. At AlexWindshield, our senior technicians bring decades of auto glass expertise to every job, utilizing industry-leading materials to guarantee your GMC Canyon remains road-worthy and structurally sound for years to come.
The Master Technician's Blueprint: A-Z Windshield Replacement Process
Auto glass replacement is a precise science. To guarantee safety and longevity, our technicians follow a rigorous, strictly documented step-by-step protocol tailored specifically for the 2004-2012 GMC Canyon.
Step 1: Vehicle Assessment and Interior Protection
Before any tools are drawn, we conduct a comprehensive pre-inspection of your truck's front end, documenting the condition of the paint, the cowl panel, and existing wiper alignment. Preparation is critical to our process. We lay down heavy-duty protective blankets over your truck's hood and fenders to prevent accidental scratches. Inside the cabin, we drape protective covers over the dashboard, steering wheel, and front seats. Protecting the interior from debris, urethane drips, and sharp glass shards is our top priority, ensuring your Canyon is returned to you in pristine condition.
Step 2: Cowl, Wiper, and Exterior Molding Removal
The lower section of the 2004-2012 GMC Canyon windshield is housed beneath a plastic cowl panel. We meticulously unbolt the windshield wiper arms using specialized pullers to avoid stressing the wiper transmission. Next, we detach the plastic cowl assembly and disconnect the washer fluid hoses. The top and side rubber moldings—often sun-baked and brittle on first-generation Canyons—are carefully extracted. We meticulously clear out years of accumulated dirt, pine needles, and road debris from the cowl area before proceeding.
Step 3: Precision Removal of the Old Damaged Glass
To break the original urethane seal holding the broken windshield, we employ advanced auto glass removal tools. Depending on the condition of the original adhesive, we utilize a highly precise cold knife or a specialized fiber-line cutting system. The fiber-line system wraps around the perimeter of the glass, cleanly slicing through the hardened urethane from the inside out. This modern technique ensures zero damage to the GMC Canyon’s metal pinch weld and interior headliner. Once the seal is fully severed, two technicians use heavy-duty suction cups to safely lift the heavy, damaged windshield away from the vehicle.
Step 4: Pinch Weld Preparation and Deep Cleaning
This step separates the masters from the amateurs. We perform a precise "trim-down" of the old urethane, leaving a microscopic, perfectly uniform layer of the original adhesive—about 1 to 2 millimeters thick—to serve as a bonding base for the new sealant. We then subject the entire pinch weld to a rigorous surface cleaning. Using highly formulated, alcohol-based auto glass cleaners, we eliminate every trace of dirt, moisture, and chemical residue. If we detect any surface rust—a common issue for older trucks in the GTA—we immediately sand it down to bare metal to prevent the corrosion from spreading beneath the new installation.
Step 5: Bare Metal Treatment and Primer Application
To guarantee a permanent, waterproof seal, the pinch weld must be chemically prepped. We apply a specialized, high-grade auto glass primer to any exposed bare metal and directly over the remaining urethane track. This primer acts as a rust inhibitor and creates an aggressive chemical bite for the new adhesive. We also apply a specific glass primer to the ceramic frit band on the inside perimeter of the new OEM-equivalent windshield. We allow the primer to flash (dry) completely, matching the exact chemical curing times dictated by the manufacturer.
Step 6: Application of High-Quality Urethane Adhesive
With the frame primed and ready, we load a professional-grade, electric caulking gun with an advanced, fast-curing high-quality urethane adhesive. We apply the urethane in a perfectly uniform, continuous "V-bead" around the entire perimeter of the pinch weld. The V-bead is the industry gold standard; it ensures that when the glass is compressed into the frame, the adhesive spreads evenly without trapping air bubbles, creating a flawless, structural bond that reinforces the roof of your GMC Canyon.
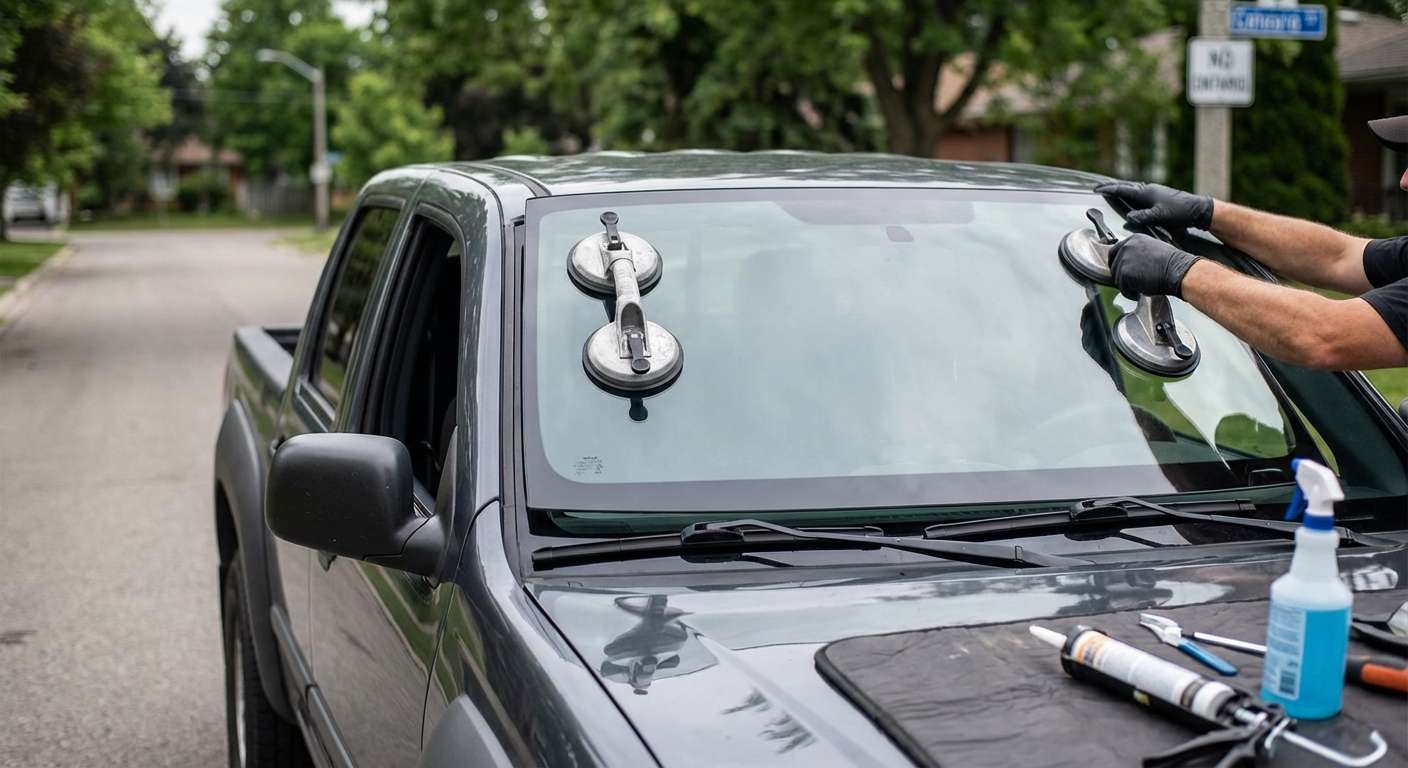
Step 7: Precision Installation of the New Windshield
Timing is critical once the urethane is applied. Two technicians carefully lift the freshly primed windshield and align it perfectly with the GMC Canyon’s frame. Using the truck’s VIN notch and alignment pins as a guide, we gently lower the glass into the wet adhesive. We apply calculated, even pressure around the edges to compress the V-bead and set the glass permanently. Finally, we reinstall the cowl panel, reattach the wiper arms to their exact factory positions, and fit a brand-new, weather-resistant exterior molding to seal the aesthetic gaps.
Mandatory ADAS Camera and Sensor Calibration
While the first-generation 2004-2012 GMC Canyon predates today’s highly complex lane-keep assist systems, auto glass technology and safety standards have evolved drastically. Many drivers of older trucks have retrofitted advanced safety features, integrated smart dash-cams with proximity sensors, or possess high-end trim packages with complex electrochromic rearview mirrors and OnStar sensor arrays. Furthermore, as an uncompromising standard of modern safety, AlexWindshield enforces a strict policy: any windshield replacement that interacts with forward-facing safety mechanisms requires a mandatory ADAS camera calibration process.
Even a millimeter of deviation in glass thickness, curvature, or installation angle can severely distort the optics of mounted sensors. If your specific vehicle configuration is equipped with any Advanced Driver Assistance Systems, our Master Technicians utilize state-of-the-art optical targeting equipment to digitally realign the cameras. We perform both static and dynamic calibrations to ensure your safety systems read the road with pinpoint accuracy. Skipping this mandatory process can result in phantom braking, failed collision warnings, and compromised occupant safety. We guarantee that when you drive away, your vehicle’s electronic eyes are just as sharp as the brand new glass you are looking through.
Post-Installation Care for Your GMC Canyon
To ensure the high-quality urethane adhesive cures perfectly, we provide every customer with strict post-installation guidelines:
- Safe Drive-Away Time: We strictly observe the Minimum Drive-Away Time (MDAT) of our urethane, usually requiring the vehicle to sit for at least 30 to 60 minutes before it is safe to operate.
- Leave the Tape: If retention tape was used to hold the glass firmly while curing, leave it intact for at least 24 hours.
- Avoid High-Pressure Washes: Do not take your GMC Canyon through a high-pressure commercial car wash for a minimum of 48 hours to prevent water from forcing its way through the curing seal.
- Keep Windows Cracked: Leave a window cracked about an inch for the first 24 hours. This prevents the pressure spike caused by slamming your truck doors from pushing the newly installed windshield out of its urethane bed.
Premier Mobile Auto Glass Service Across the Greater Toronto Area (GTA)
We know that a broken windshield disrupts your busy schedule. You don't have time to sit in a dusty waiting room. That is why AlexWindshield operates a fleet of fully equipped, state-of-the-art mobile service units. We bring the entire auto glass shop directly to your driveway, workplace, or job site. Our premier mobile auto glass services are fully available across the Greater Toronto Area (GTA). Whether you are parked at a commercial facility in Vaughan, at your residential home in Richmond Hill, or running errands in Markham, our Master Technicians arrive promptly with everything needed to execute a flawless, factory-grade installation on site.
Trust AlexWindshield for Your Auto Glass Needs
Your 2004-2012 GMC Canyon is a reliable, tough machine that deserves top-tier professional care. Do not compromise your safety, your truck’s structural integrity, or your visibility by choosing substandard glass or inexperienced technicians. As the leading auto glass replacement specialists in the GTA, AlexWindshield is committed to unparalleled craftsmanship, utilizing only industry-leading urethane and OEM-equivalent glass. Every installation we perform is backed by our comprehensive Lifetime Warranty against leaks, wind noise, and manufacturer defects. For precision, safety, and ultimate convenience in Vaughan, Richmond Hill, Markham, and beyond, trust the Master Technicians at AlexWindshield to get you clearly and safely back on the road.