The Iconic 2011-2016 MINI Countryman (R60): Preserving Your Go-Kart Dynamics and Structural Integrity
The first-generation MINI Countryman (R60), produced from 2011 to 2016, revolutionized the brand by introducing a larger, four-door crossover platform without sacrificing the legendary, responsive go-kart handling MINI is known for. One of the defining structural and visual characteristics of the R60 is its distinctively upright, panoramic windshield. This glass does more than just shield you from the elements; it is a critical structural component of the vehicle's cabin, bearing a significant portion of the roof's load during a rollover and serving as the backstop for passenger airbag deployment. When your R60 suffers from a severe rock chip or a sprawling crack, standard glass repair simply won't cut it. You need a master technician's touch to restore the factory-level safety and aesthetics of your prized vehicle.
Mobile Auto Glass Excellence Across the Greater Toronto Area (GTA)
Driving with a compromised windshield is a major safety hazard. At AlexWindshield, we understand that finding time to visit an auto glass shop can disrupt your busy schedule. That is why we offer premium, fully equipped mobile windshield replacement services throughout the Greater Toronto Area (GTA). Our mobile technicians bring the auto glass shop directly to your driveway, workplace, or preferred location.
Whether you are navigating the busy retail sectors of Vaughan, commuting through the expanding tech hubs of Markham, or enjoying the scenic suburban routes of Richmond Hill, our master technicians arrive promptly with the exact OEM-quality glass and specialized tools required for your MINI Countryman. We ensure that your daily routine remains uninterrupted while we perform a flawless, factory-standard windshield replacement right where you are.
The Master Technician's Step-by-Step Windshield Replacement Process for the R60
Replacing the windshield on a 2011-2016 MINI Countryman is not a generic procedure. The R60 features unique exterior A-pillar moldings, sensitive cowl plastics, and integrated rain/light sensors that require exact precision. Here is our rigorous, A-to-Z technical process to ensure a perfect installation every single time.
Step 1: Comprehensive Pre-Inspection and Interior Protection
Before any tools touch your vehicle, we conduct a thorough pre-installation inspection. We test the functionality of your wipers, rain sensors, and interior electronics to establish a baseline. Next, we prioritize protecting the interior and exterior of your MINI. We drape heavy-duty protective covers over the hood and fenders to prevent accidental scratches. Inside the cabin, we deploy clean drop cloths over the dashboard, steering wheel, and front seats. This ensures that absolutely no dust, debris, or chemical residue enters your vehicle's interior during the replacement process.
Step 2: Precision Removal of Hardware and Exterior Trims
The R60 Countryman has specific trim pieces that must be carefully dismantled. We begin by unbolting the windshield wiper arms and gently prying off the lower plastic cowl panel that sits at the base of the glass. The MINI's exterior A-pillar gloss trims are notoriously fragile; our technicians use specialized nylon pry tools to unclip these side moldings without damaging the retaining clips. Inside the cabin, we meticulously disconnect the rearview mirror assembly, the rain/light sensor, and the forward-facing camera systems from the existing glass.
Step 3: Extricating the Old Windshield
To cut through the factory urethane holding the damaged windshield in place, we utilize an advanced fiber-optic wire cutting system. Unlike traditional cold knives that can easily scratch the vehicle's paint, the wire system uses a high-tensile braided line that wraps around the perimeter of the glass. This cleanly slices through the old high-modulus urethane adhesive from the inside out. Once the seal is broken, two technicians use heavy-duty vacuum suction cups to lift the heavy old glass safely away from the vehicle.
Step 4: Pinch Weld Preparation and Surface Cleaning
This is arguably the most critical step for ensuring a leak-proof seal. The metal frame where the glass sits, known as the pinch weld, is currently coated with old adhesive. We use specialized scraper blades to trim the old urethane down to a uniform, thin layer of approximately 1 to 2 millimeters. We never strip it to bare metal, as this original base provides the best bonding surface for the new adhesive. After trimming, we use powerful vacuums and high-grade chemical degreasers to perform a meticulous surface cleaning of the entire channel, removing all dirt, moisture, and micro-debris.
Step 5: Primer Application and Chemical Pre-Treatment
If any bare metal was exposed during the removal process, we treat it immediately with an anti-corrosion bare-metal scratch primer to prevent future rust formation. We then apply a specialized glass primer to the black ceramic band (the frit) on the perimeter of the new OEM-quality windshield. This primer acts as a chemical bridge, promoting a molecular bond between the smooth glass and the urethane adhesive. We also apply a chemical activator to the old urethane track on the vehicle body, ensuring maximum adhesion.
Step 6: Dispensing High-Quality Urethane Adhesive
Using an electric, high-torque caulking gun, we extrude a continuous, thick bead of premium, fast-curing automotive urethane around the pinch weld. The bead is applied in a specific "V" shape, which guarantees that when the glass is pressed down, the adhesive collapses evenly, eliminating any chance of air pockets, wind noise, or water leaks.
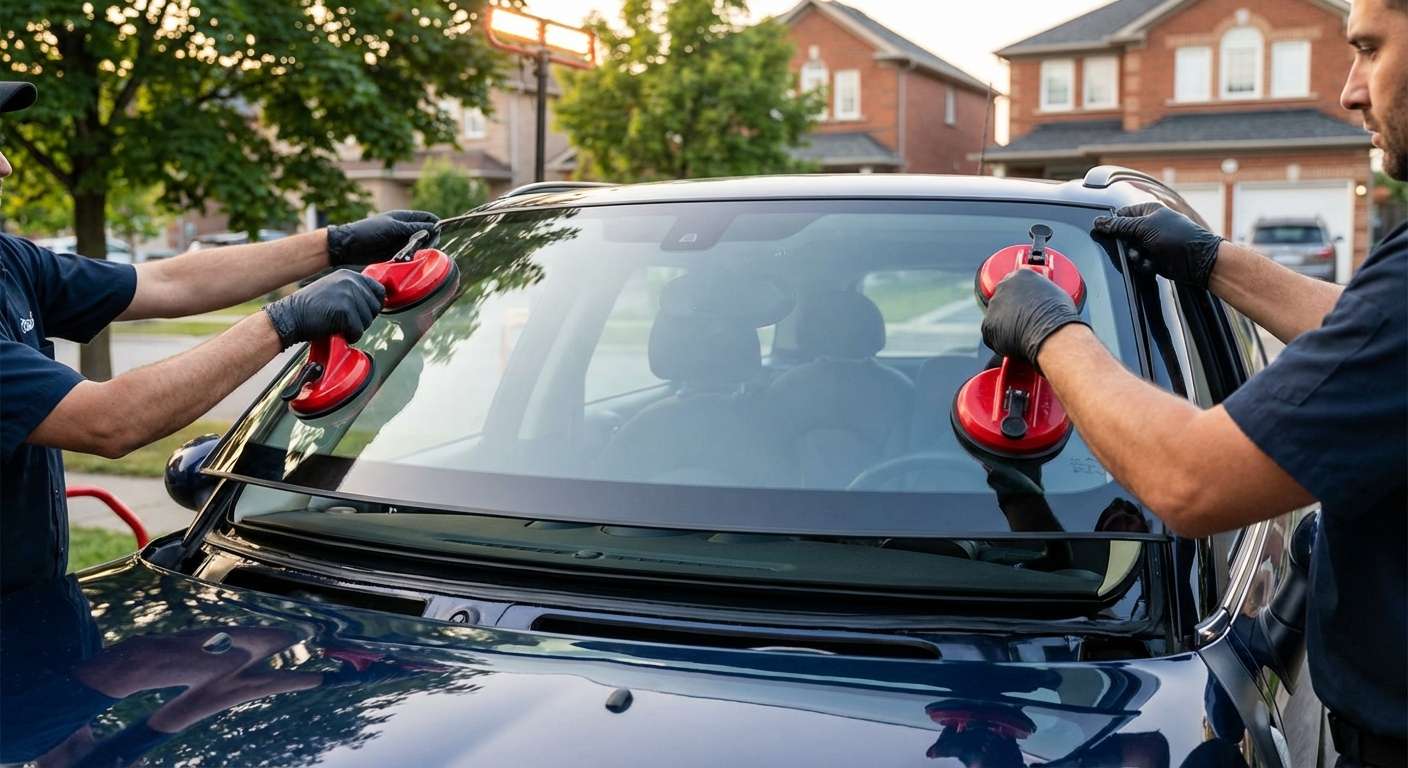
Step 7: Installation of the New Glass
With the fresh urethane perfectly laid, our technicians once again utilize specialized suction lifting tools. We carefully align the new windshield over the R60's frame. With synchronized precision, the glass is lowered into the adhesive bed. We apply gentle, even pressure around the perimeter to seat the glass into the urethane, ensuring exact flushness with the roofline and A-pillars. We then reassemble the cowl, reattach the wipers, clip the A-pillar trims back into place, and reconnect the interior mirror and sensor arrays, complete with a new silicone gel pad for the rain sensor to ensure flawless functionality.
Step 8: Mandatory ADAS Camera Calibration
Because the topic is a windshield replacement, it is absolutely imperative to address the vehicle's Advanced Driver Assistance Systems (ADAS). While the 2011-2016 MINI Countryman predates some of the most complex autonomous systems, many models in this generation are equipped with forward-facing cameras mounted behind the rearview mirror for features like high-beam assist and early collision warning. ADAS camera calibration is mandatory following a windshield replacement.
Even a millimeter of deviation in the camera's new viewing angle through the new glass can result in safety systems miscalculating distances. At AlexWindshield, our mobile units are equipped with state-of-the-art diagnostic software and targeting systems. We connect to your MINI's OBD-II port to initiate a dynamic or static calibration process. We precisely align the camera's pitch, yaw, and roll to the manufacturer's exact specifications, guaranteeing your safety systems react flawlessly when you need them most.
Post-Installation Care for Your MINI Countryman
After the installation and calibration are complete, the urethane requires a strict "Safe Drive-Away Time" (SDAT) to cure to a safe structural level. Because we use premium, fast-curing adhesives, this downtime is generally kept to a minimum (typically 30 to 60 minutes). However, we provide clear instructions for the next 48 hours to guarantee the integrity of your new auto glass:
- Leave the retention tape in place: Do not remove the specialized tape holding the top corners of the glass for at least 24 hours.
- Avoid high-pressure car washes: Hand wash only, or avoid washing the car entirely for 48 hours to prevent high-pressure water from disrupting the curing urethane.
- Keep a window slightly cracked: If parking in the hot sun, leave a side window open an inch to prevent air pressure build-up inside the cabin from pushing against the new seal.
- Avoid severe bumps: Drive carefully and avoid aggressive cornering, large potholes, or uneven driveways that could cause the chassis to flex while the adhesive is still reaching maximum hardness.
Choose AlexWindshield: Your Trusted Mobile Auto Glass Experts
Do not compromise the safety and structural integrity of your 2011-2016 MINI Countryman (R60) with subpar glass repair services. AlexWindshield is recognized as the leading expert for mobile auto glass solutions across the Greater Toronto Area (GTA). Whether you are at home in Richmond Hill, at the office in Markham, or anywhere in Vaughan, our Master Technicians deliver unparalleled craftsmanship directly to your door.
We stand firmly behind the quality of our work, the precision of our ADAS calibrations, and the premium materials we use. That is why every windshield replacement performed by AlexWindshield is backed by our comprehensive Lifetime Warranty against leaks, wind noise, and manufacturer defects. Book your mobile service today, and experience the ultimate standard in automotive glass replacement.